![]()
BOSH for Beginners
Posted on 02 Jun 2019
In this article, I want to explain what Bosh is, its main concepts, and how to use it practically to deploy software.
What is BOSH?
According to Bosh official documentation:
BOSH allows individual developers and teams to easily version, package and deploy software in a reproducible manner.
Any software, whether it is a simple static site or a complex multi-component service, will need to be updated and repackaged at some point. This updated software might need to be deployed to a cluster, or it might need to be packaged for end-users to deploy to their own servers. In a lot of cases, the developers who produced the software will be deploying it to their own production environment. Usually, a team will use a staging, development, or demo environment that is similarly configured to their production environment to verify that updates run as expected. These staging environments are often taxing to build and administer. Maintaining consistency between multiple environments is often painful to manage.
BOSH was originally developed by Cloud Foundry Foundation to manage the deployment of Cloud Foundry, an open-source platform as a service (PaaS) software. The goal of Cloud Foundry developers was to have a tool to create, test, and deploy the different pieces of the software (microservices) and help the site reliability engineers (SREs) to easily maintain it.
Software deployment requires to address a lot of different items like:
- software packaging and versioning
- deploying and upgrade software reproducibly
- deploying software in a distributed way
Many tools like Chef, Puppet, Docker exist that address one or more of these items. BOSH was designed to do each of these as a whole. It was purposefully constructed to address the four principles of modern Release Engineering.
BOSH Main Components
The following figure shows the Bosh main components. An administrator can manage Bosh environments using a Bosh Cli that sends commands to the Bosh Director that is a server that keeps track of all the deployment aspects.
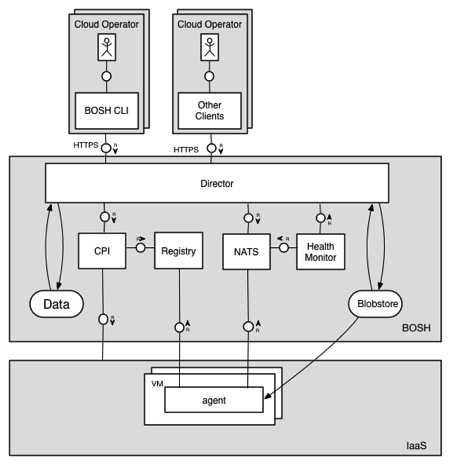
Figure from https://bosh.io
Internally, there is a CPI that is an API that the Director uses to manage IaaS components like VM, storage, network, and so on. Bosh support different IaaS systems (i.e. Softlayer, AWS, Virtual Box, Google Cloud Platform, and so on) and to interact with them he needs the CPI specific for each Cloud provider.
VM that lives in the IaaS environment includes a Bosh Agent that interacts with the Director to manage the software deployment on it. They communicate through a message system based on a publisher-subscriber approach (NATS).
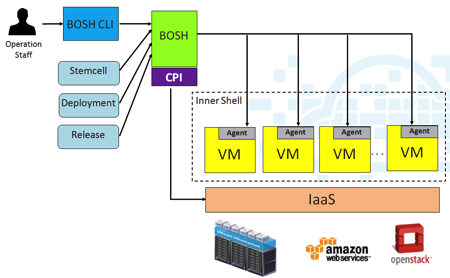
Figure from http://www.think-foundry.com
When an administrator sends commands to the Director via Bosh CLI a task is created that is inserted in the Task Queue managed by the Director. Other tasks can be scheduled by the Director itself to manage the infrastructure. These tasks are managed by a pool of workers.
Health Monitor component is used to check periodically the status of different VMs. It communicates with Bosh Agent via heartbeat and if it is unresponsive for a specific period of time the VM is considered not live.
BOSH Main Concepts
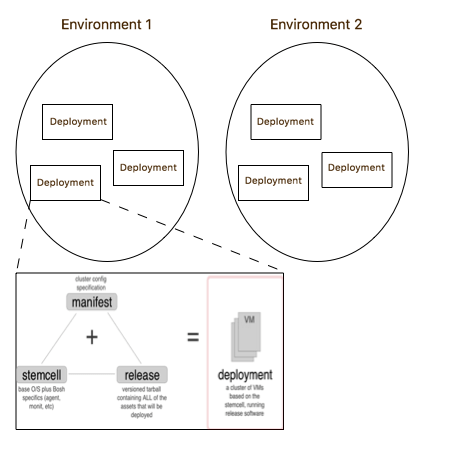
Bosh administrator can administer multiple Cloud environments using a single Bosh CLI. The first concept to understand is the Environment that is the Cloud scope where software deployment occurs. Bosh can manage one or more environments.
In each environment, you can have one or more Deployments. A Bosh deployment has four main concepts: Manifest, Release, Stemcell, and Instance.
- Manifest: describes how to combine Releases, Stem cells, and Instances to create a deployment.
- Release: A release is a versioned collection of configuration properties, configuration templates, startup scripts, source code, binary artifacts, and anything else required to build and deploy software in a reproducible way.
- Stem cell: A stem cell is a versioned Operating System image wrapped with IaaS specific packaging. A typical stem cell contains a bare minimum OS skeleton with a few common utilities pre-installed, a BOSH Agent, and a few configuration files to securely configure the OS by default.
- Instance (VM): A deployment is made up of instances. Normally, instances represent long-running servers on your cloud infrastructure. They can also represent “errands” – one-off tasks that can be run inside of temporary servers.
A Release is deployable on different instances, for example, a PostgreSQL server and CLI could be installed on two separate instances. To manage this distributed deployment method each Bosh Release has one or more jobs. A job contains:
- configuration metadata
- ERB configuration file
- Monit file
- starts/stop and hooks scripts
and it can be deployed on a specified instance. A Job has one or more template files and one or more packages. A package could be the source code or dependencies.
BOSH Lite install
Bosh Lite is a Bosh you can install on your local machine to get familiar with the tool. It has a local Director and it uses a Bosh CLI to administer it. You can install the Bosh CLI using the following procedure. To install the Director you need to install Virtual Box as a prerequisite and then follow this procedure.
In the Director install procedure, there is a step to set the BOSH_CLIENT and BOSH_CLIENT_SECRET environment variable. To avoid running them whenever you start a new terminal I suggest you put them in the .bash_profile.
BOSH commands cheatsheet
When I start to play with a technology I try to find the minimum set of commands that help me to manage the majority of my activity with it. For this reason, I think that building a personal cheatsheet is the best approach to learn new technology.
Once you installed Bosh Lite you can see that it has a single environment called vbox with the following command:
bosh envs
To see all the deployments in the vbox environment you can use the following command:
bosh -e vbox deployments
To avoid to specify every time the environment you can set the BOSH_ENVIRONMENT variable in
you .bash_profile:
export BOSH_ENVIRONMENT=vbox
From this moment on I assume you did it so I don’t specify the -e option anymore. When you list your deployment you can notice that initially, it is empty.
As a first step, we can upload on the Director the stem cell to use for our deployment. BOSH produces official stemcells for popular operating systems and infrastructures. For example, for Ubuntu 16 Xenial we can use the latest version of the following one. Here the command to upload it on the Director:
bosh upload-stemcell --sha1 632b2fd291daa6f597ff6697139db22fb554204c https://bosh.io/d/stemcells/bosh-warden-boshlite-ubuntu-xenial-go_agent?v=315.13
List the uploaded stemcell with the command:
bosh stemcells
The next step is to upload the release we want to deploy. For this tutorial, I created a simple Release containing an HTTP server that when contacted by a browser returns the “Hello World” message. You can download the package from here. Uncompress it in the folder _
Here the commands to create and upload the release:
cd <workdir>/simple-bosh-release
bosh create-release --force
bosh upload-release
You can list the uploaded release with the command:
bosh releases
The last step is to create a VM instance starting from the uploaded stemcell and deploy the release on it. You can do it with the following command:
bosh -d simple-bosh-release deploy deployments/manifest.yml
To list the VMs created by Bosh during the deployment you can use the following command:
bosh vms
Your HTTP server is now running on 10.243.1.2 address, however, you cannot access to it from your machine unless you do not redirect all the traffic to this IP to the Virtual Machine containing the Director 192.168.50.6.
You can do it with the following commands:
sudo route add -net 10.244.0.0/16     192.168.50.6 # Mac OS X
sudo ip route add   10.244.0.0/16 via 192.168.50.6 # Linux (using iproute2 suite)
sudo route add -net 10.244.0.0/16 gw  192.168.50.6 # Linux (using DEPRECATED route command)
route add           10.244.0.0/16     192.168.50.6 # Windows
Open your browser and insert the following IP 10.243.1.2 in the address bar. The “Hello World!” message will appear.
To clean up the artifact you uploaded on Bosh you first need to delete the deployment with the command:
bosh -d simple-bosh-release delete-deployment
Now you can delete the release with the command:
bosh delete-release simple-bosh-release
Finally, you can delete the stem cell with the command:
bosh delete-stemcell <stemcell name>/<stemcell version>
Obviously, this is the first set of commands you will use with Bosh, however, there are other useful commands to manage tasks, blob, disk, networking, and much more. You can see a complete list here.
How to create a Bosh release
In the previous paragraph, we played with Bosh commands using the simple-bosh-release project as an example of release. The question now is: how I built it?
Simple Bosh Release is a project I forked from here and modified to support Bosh v2, Ubuntu 16 Xenial, and Apache 2.4.39. You can follow, step by step, the instructions to build it reading the home page of the project.
Final thoughts
I hope this article, helped you to have a good overview of Bosh’s main concepts and how to use it to deploy software. If you work with Cloud Foundry it is a must-have technology. It can be used in all the situation where it is required to manage the whole application lifecycle and infrastructure. Bosh integrates well with a lot of Cloud providers. To complete your skills on Bosh I suggest you read the official documentation and good tutorials like this one.

