How docker networking works
Posted on 20 Jul 2018
This is the fourth article of the Getting started with Docker series. In this article, I want to discuss a bit about how Docker networking works. These concepts will be used to modify the PostgreSQL code to create three containers that communicate with each other via TCP/IP.
Networking overview in Docker
Docker has a pluggable networking system where plugins are called drivers. Docker provides by default some drivers whose names are:
- bridge;
- host;
- overlay;
- macvlan;
- none.
When a container uses the type none the networking is disabled.
The bridge networking
The bridge driver is the default one and it creates a private network that allows containers to communicate with each other. Behind the scenes, the Docker Engine creates the necessary Linux bridges, internal interfaces, IP-tables rules, and host routes to make this connectivity possible.
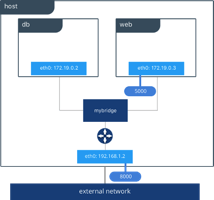
External access is granted by exposing ports to containers. In the following photo, you can see the containers web and db attached to the same bridge driver on the same host that allow them to communicate.

Photo from https://blog.docker.com
The host networking
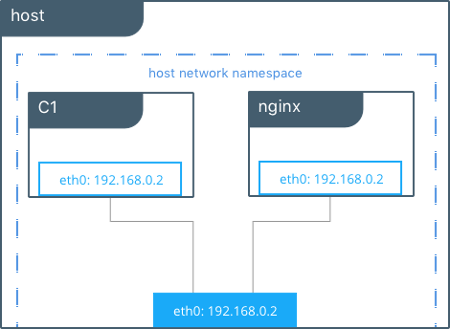
The host driver allows the container to use directly the host network facility without any mapping. This driver is particularly useful in scenarios where networking sharing between containers is not necessary. In the following image, you can see the containers C1 and nginx share the same host network interface.
The overly networking
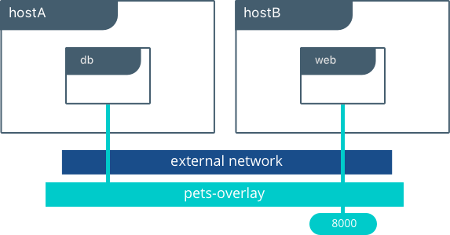
The overlay driver allows the communication between containers running on different hosts.
The macvlan networking
The macvlan driver allows assigning a Mac address to a container. Using this driver is sometimes the best choice when dealing with legacy applications that expect to be directly connected to the physical network, rather than routed through the Docker host’s network stack.

In this article series, I want to focus mainly on the bridge driver because we will use it to allow our cluster containers to communicate. If you want more details on Docker network driver you can read the official documentation.
Docker networking commands
The command to create a network using a bridge driver is:
docker network create -d bridge --gateway=GATEWAY --subnet=SUBNET/NETWORK_PREFIX_BITS NETWORK_NAME
for example, suppose we want to create the subnet 10.1.1.0 we can have the following values:
- GATEWAY=10.1.1.1
- SUBNET=10.1.1.0
- NETWORK_PREFIX_BITS=24.
The same command can be used to create other network type specifying the driver name with the -d option.
After the creation of a network, we can create a container attached to it with its own hostname and IP address using the following command.
docker create -it --net NETWORK_NAME --ip IP --hostname HOSTNAME--name CONTAINER_NAME --publish HOST_SSH_PORT:22 TAG /bin/bash
The TAG is the name of the image used to create the container. CONTAINER_NAME is the name of the container. NETWORK_NAME is the name of the network and HOSTNAME and IP are, respectively, the hostname and the IP assigned to the container.
Other containers on the same network can reference the container using the IP address or the hostname. The host system references the container using localhost and services or ports exposed.
Create the three PostgreSQL containers
In this section, we can modify the start_containers.sh script to create three PostgreSQL containers that communicate with each other via TCP/IP. Each container has a hostname and IP assigned.
NODE1_NAME=node1
NODE2_NAME=node2
NODE3_NAME=node3

NODE1_PORT=5432
NODE2_PORT=5433
NODE3_PORT=5434

NODE1_PRIVATE_IP=10.0.2.31
NODE2_PRIVATE_IP=10.0.2.32
NODE3_PRIVATE_IP=10.0.2.33

PRIVATE_NETWORK_NAME=node_private_bridge

docker network create -d bridge --gateway=10.0.2.1 --subnet=10.0.2.1/24 ${PRIVATE_NETWORK_NAME}

docker create -it --net ${PRIVATE_NETWORK_NAME} --ip ${NODE1_PRIVATE_IP} --hostname ${NODE1_NAME} --name ${NODE1_NAME} -p ${NODE1_PORT}:5432 postgresql /bin/bash
docker create -it --net ${PRIVATE_NETWORK_NAME} --ip ${NODE2_PRIVATE_IP} --hostname ${NODE2_NAME} --name ${NODE2_NAME} -p ${NODE2_PORT}:5432 postgresql /bin/bash
docker create -it --net ${PRIVATE_NETWORK_NAME} --ip ${NODE3_PRIVATE_IP} --hostname ${NODE3_NAME} --name ${NODE3_NAME} -p ${NODE3_PORT}:5432 postgresql /bin/bash
docker start ${NODE1_NAME}
docker start ${NODE2_NAME}
docker start ${NODE3_NAME}
We created the node_private_bridge bridge network with subnet 10.0.2.1/24 and gateway 10.0.2.1. Then we assigned to each container a hostname and an IP.
We modified the stop_containers.sh script to clean up the three containers and the network driver.
NODE1_NAME=node1
NODE2_NAME=node2
NODE3_NAME=node3

NODE1_PORT=5432
NODE2_PORT=5433
NODE3_PORT=5434

NODE1_PRIVATE_IP=10.0.2.31
NODE2_PRIVATE_IP=10.0.2.32
NODE3_PRIVATE_IP=10.0.2.33

PRIVATE_NETWORK_NAME=node_private_bridge

docker network create -d bridge --gateway=10.0.2.1 --subnet=10.0.2.1/24 ${PRIVATE_NETWORK_NAME}

docker create -it --net ${PRIVATE_NETWORK_NAME} --ip ${NODE1_PRIVATE_IP} --hostname ${NODE1_NAME} --name ${NODE1_NAME} -p ${NODE1_PORT}:5432 postgresql /bin/bash
docker create -it --net ${PRIVATE_NETWORK_NAME} --ip ${NODE2_PRIVATE_IP} --hostname ${NODE2_NAME} --name ${NODE2_NAME} -p ${NODE2_PORT}:5432 postgresql /bin/bash
docker create -it --net ${PRIVATE_NETWORK_NAME} --ip ${NODE3_PRIVATE_IP} --hostname ${NODE3_NAME} --name ${NODE3_NAME} -p ${NODE3_PORT}:5432 postgresql /bin/bash
docker start ${NODE1_NAME}
docker start ${NODE2_NAME}
docker start ${NODE3_NAME}
You can now access to whatever container with the command:
docker exec -it nodeX /bin/bash
where X could be 1, 2, or 3, and ping the other two containers using the node name or the IP.
What’s next?
In this article, we explained the docker network capabilities focusing mainly on the bridge driver, we modified the PostgreSQL project code to create three containers that communicate with each other via TCP/IP. In the next article, we will use these three containers to create a PostgreSQL cluster.

