
Getting Started with HTML: A Beginner’s Guide
Posted on 23 Jan 2023
In this article, I will talk about HTML, the language that forms the foundation of the web. By the end of this guide, I will create step by step a website with five pages containing paragraphs, headlines, links, images, text, and so on.
You can find the source code of this guide in the part-1 folder of this repository. This guide covers the first 10 lessons.
What is HTML?
Hypertext Markup Language (HTML) is the language used for creating web pages and applications. It allows developers to create web pages with with paragraphs, headings, links, images, video, and more.
HTML uses a series of Elements each one composed of two Tags. Tags are enclosed in angle brackets and typically come in pairs, with an opening and closing tag. The content goes between them. For example, the opening tag <p> represents a paragraph, and the closing tag </p> indicates the end of the paragraph.
By using HTML, developers can create rich, interactive, and engaging web pages that can be accessed by users across the world.
A bit of History
HTML was initially developed to provide a way to share scientific research and information over the internet. As the World Wide Web grew in popularity, the need for a more advanced and user-friendly language for creating web pages became evident. Over the years, HTML has undergone several revisions and updates to add new features and capabilities.
Today, HTML is the backbone of the World Wide Web, and almost all websites and web applications use HTML in some form or another. It is a powerful and versatile language that continues to evolve and improve, providing new and exciting ways for developers to create dynamic and interactive web content.
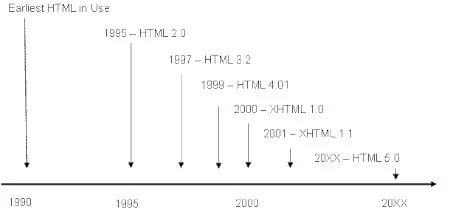
Over the years, different HTML versions were released. Here is a brief overview of these versions and the key features and improvements they introduced:
-
HTML 1.0: This was the first version of HTML, developed in 1990 by Tim Berners-Lee. It provided a basic set of tags for creating simple web pages, including tags for headings, paragraphs, lists, and links.
-
HTML 2.0: This version of HTML was released in 1995 and added support for tables, text formatting, and additional multimedia elements like images and audio files.
-
HTML 3.2: The third version of HTML, released in 1997, introduced support for forms, scripts, and other advanced features. It also added support for style sheets, which allowed developers to separate the presentation of a web page from its content.
-
HTML 4.01: This version of HTML, released in 1999, added support for more multimedia elements and introduced new tags for creating interactive web applications. It also added support for internationalization and the ability to use XML-based languages like MathML and SVG.
-
HTML 5: The latest version of HTML, released in 2014, added many new features and capabilities, including support for video and audio playback, local storage, and offline web applications. It also introduced a new approach to web development called “responsive design”, which allows web pages to adapt to different screen sizes and devices.
The history of HTML, however, has not always been linear. At a certain point, the W3C competition decided to embark on a new path which, over time, has proved unsuccessful. This path involved the development of XHTML as a natural succession of HTML 4.0.
XHTML, which stands for Extensible Hypertext Markup Language, is a markup language that is based on HTML but uses stricter syntax rules. It was developed in the late 1990s as a way to make HTML more consistent and compatible with other XML-based languages.
-
XHTML 1.0, the first version of XHTML, was released in 2000 and was based on HTML 4.0. It introduced several changes to the HTML language, including the use of lowercase tags, the requirement for all tags to be closed, and the requirement to use quotation marks around attribute values.
-
XHTML 1.1, released in 2001, added support for additional modules, such as ruby annotations and bidirectional text, and introduced additional rules for creating well-formed documents.
-
XHTML 2.0, which was under development for several years but was never completed or released, would have introduced even more significant changes to the HTML language. However, this version of XHTML was eventually abandoned in favor of a new approach called HTML5.
Today, XHTML is not as widely used as it once was, but it continues to be supported by many web browsers and is still used by some developers for creating web pages.
The HTML Basic structure
A basic HTML document has a very simple structure and consists of the following elements:
- A DOCTYPE declaration specifies the version of HTML that the document uses.
- The html element is the root element of the document and encloses all other elements.
- A head element contains metadata about the document, such as the title, character set, styles, and scripts.
- A body element contains the main content of the document, such as headings, paragraphs, images, and links.
Here is an example of a basic HTML document:
<!DOCTYPE html>
<html>
<head>
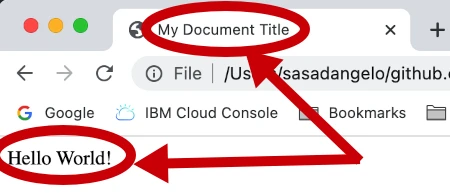
<title>My Document Title</title>
</head>
<body>
<h1>Hello, World!</h1>
<p>This is my first web page.</p>
</body>
</html>
As you can see, the DOCTYPE declaration, the HTML element, the head element, and the body element are all nested within each other, with the DOCTYPE declaration at the top, and the body element at the bottom. The head element contains metadata about the document, and the body element contains the main content.
Download your first HTML document of lesson 1. Its name is index.html and you can open it with your browser (Chrome, Firefox, Microsoft Edge, Internet Explorer, or Safari) by clicking on File->Open File… to render it. Here is the result.
HTML Elements, Tags, and Attributes
In HTML, elements are the basic building blocks used to create a web page. These elements are represented by tags, which are keywords surrounded by angle brackets. For example, the p tag is used to create a paragraph element, and the h1 tag is used to create a heading element.
Here is an example of a simple HTML tag:
<p>This is a paragraph.</p>
In this example, the <p> tag is used to mark up a paragraph of text. The <p> tag has an opening tag <p> and a closing tag </p>, with the content in between.
In addition to the basic structure provided by tags, HTML also supports the use of attributes. Attributes are used to provide additional information about an element. They are added to the opening tag of an element and consist of a name and a value, separated by an equals sign. For example, the src attribute is used to specify the source of an image, and the href attribute is used to specify a link.
Here is an example of an HTML tag with an attribute:
<a href="http://www.example.com">This is a link.</a>
In this example, the <a> tag is used to create a link to another web page. The href attribute is used to specify the URL of the page that the link should go to.
So, to sum up, Elements are used to structure and format the content of a web page. Each Element is enclosed in an open and closed Tag. Attributes are used to provide additional information or to modify the behavior of a tag. Together, elements. tags and attributes form the basic building blocks of an HTML document.
The head tag
The <head> element is a container for HTML metadata (data about the document, such as its title, character set, styles, and scripts). The metadata is not displayed on the page but is used by browsers and search engines to understand the content of the page.
The <head> element should be placed at the beginning of the <html> element and must contain a <title> element, which specifies the title of the document. The <head> element can also include other elements, such as <style> for styling the page with CSS, <link> for linking to external resources, and <meta> for defining metadata, such as the character set, keywords, and description of the page.
Here is an example of an <head> element that includes a <title> element and a <meta> element:
<head>
    <meta charset="utf-8">
    <title>My Document Title</title>
</head>
As you can see, the <title> element appears within the <head> element and specifies the title of the page, and the <meta> element appears within the <head> element and defines the character set of the page.
The body tag
The <body> element is a container for the main content of an HTML. The content of the <body> element is displayed in the main window or viewport of the browser.
The <body> element should be placed after the <head> element and can contain any type of content, such as headings, paragraphs, lists, images, links, and more. This content is rendered by the browser according to the styles and layout defined by the document or by external stylesheets.
Here is an example of a <body> element that contains a heading and a paragraph:
<body>
    <h1>Hello World!</h1>
    <p>This is my first web page.</p>
</body>
As you can see, the <h1> element and the <p> element are nested within the <body> element, and their content is displayed on the page. The <h1> element represents a heading, and the <p> element represents a paragraph.
Headlines
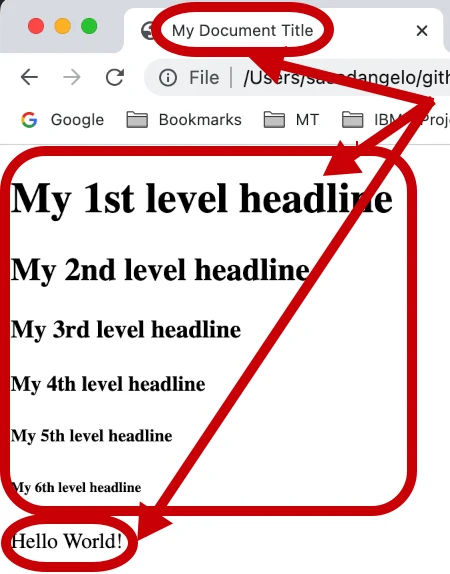
In HTML, a headline is a piece of text that is used to indicate the importance or relevance of the content that follows. Headlines are typically larger and bolder than the surrounding text, and they may also be styled differently to make them stand out. There are several different levels of headlines in HTML, ranging from level 1 (the most important) to level 6 (the least important). The level of a headline is indicated by the use of a specific HTML tag, such as <h1> for a level 1 headline or <h2> for a level 2 headline. For example, the following code would create a level 2 headline that says “Introduction”:
<h2>Introduction</h2>
Headlines are used to organize and structure the content of a webpage, making it easier for readers to navigate and understand the information being presented. They also help search engines understand the hierarchy and organization of a webpage, which can improve its visibility and ranking in search results.
Download the index.html file of lesson 2 and open it with your browser. Here is the result.
Paragraphs
In HTML, the <p> tag is used to define a paragraph of text. The <p> tag tells the web browser that the enclosed text should be treated as a paragraph, and it automatically adds some extra space before and after the paragraph to help separate it from other content on the page. The <p> tag is an example of an “inline” element, which means that it can be used within a block-level element such as a <div> or a <section> to add structure and organization to the content of a webpage. Here is an example of how the <p> tag might be used:
<p>This is the first paragraph of text on the page.</p>
<p>This is the second paragraph of text on the page.</p>
In the example above, the first and second paragraphs of text are each enclosed within their own <p> tags. This tells the web browser to treat each paragraph as a distinct block of text and to add the appropriate amount of space between them. The <p> tag is a very common and useful element in HTML, and it is used on almost every webpage to structure the content and make it easier to read.
An example of an HTML document
Here is an example of how you might use headlines and paragraphs together in an HTML document:
<h1>Introduction</h1>
<p>This is the first paragraph of the introduction, which provides a brief overview of the topic.</p>
<p>This is the second paragraph of the introduction, which expands on the ideas introduced in the first paragraph.</p>
<h2>Background Information</h2>
<p>This is the first paragraph of the background section, which provides additional context and detail about the topic.</p>
<p>This is the second paragraph of the background section, which continues to build on the information from the first paragraph.</p>
<h3>Key Points</h3>
<p>This is the first paragraph of the key points section, which summarizes the most important information from the article.</p>
<p>This is the second paragraph of the key points section, which provides a concise overview of the key ideas discussed in the article.</p>
In this example, the <h1> tag is used to create a level 1 headline for the introduction, the <h2> tag is used to create a level 2 headline for the background information, and the <h3> tag is used to create a level 3 headline for the key points. Each of these headlines is followed by one or more paragraphs of text, which provide more details and information about the topic. The use of headlines and paragraphs helps to organize the content of the webpage and make it easier for readers to understand and navigate.
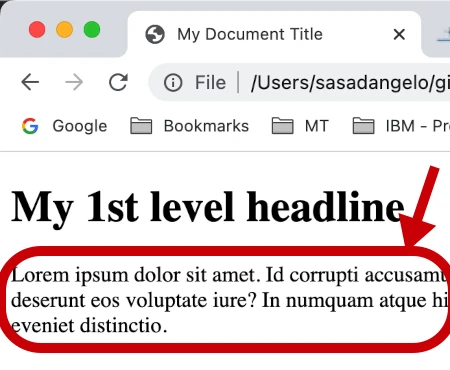
Lorem Ipsum placeholder text
Lorem Ipsum is a placeholder text that is often used by designers and printers to fill in space in a document or website. It is a dummy text that is used to give an idea of what the final content will look like, without actually having to come up with real content. At the following link, you can use an online generator to create dummy text for your website.
Download the index.html file of lesson 3 and open it with your browser. Here is the result.
Organizing Content with HTML Sections
A section in HTML refers to a distinct part of a web page that can be defined by a headline and one or more paragraphs. These sections can be used to organize and divide content on a web page into logical groups, making it easier for users to understand and navigate the page.
For example, a web page about a news article can have multiple sections: one for the introduction, one for the main body of the article, and another for the conclusion. Each section would have its headline, which can be created using one of the heading elements (<h1> to <h6>), and one or more paragraphs, which can be created using the <p> element.
<h1>My Article Title</h1>
<p>This is the first paragraph of the introduction, which provides a brief overview of the topic.</p>
<p>This is the second paragraph of the introduction, which expands on the ideas introduced in the first paragraph.</p>
<h2>My 1st section headline</h2>
<p>This is the first paragraph of the 1st section, which provides additional context and detail about the topic.</p>
<p>This is the second paragraph of the 1st section, which continues to build on the information from the first paragraph.</p>
<h2>My 2nd section headline</h2>
<p>This is the first paragraph of the 2nd section, which summarizes the most important information from the article.</p>
<p>This is the second paragraph of the 2nd section, which provides a concise overview of the key ideas discussed in the article.</p>
It’s worth noting that before HTML 5, there were no specific tags to create sections. In this guide, I just showed a way of organizing the content in a logical way. You can use any tags that you think will be more appropriate to create sections.
Download the index.html file of lesson 4, lesson 5, and lesson 6 and open them with your browser. You will see a complete web page built progressively, section by section, where each section contains a headline and one or more paragraphs.
Text Formatting with bold, italic, and underline
HTML supports several ways to format text, including bold, italic, and underline. Here’s how to use each one. To make text bold, you can use the <strong> or <b> tag. For example:
<p>This text is <strong>bold</strong></p>
To make text italic, you can use the <em> or <i> tag. For example:
<p>This text is <em>italic</em></p>
To underline text, you can use the <u> tag. For example:
<p>This text is <u>underlined</u></p>
It’s important to note that these tags are just a way to add formatting to your text. They don’t change the meaning of the text itself, and they don’t necessarily affect how the text is read by a screen reader or other assistive technology. If you want to convey the meaning or importance of your text, it’s often better to use semantic HTML tags like <strong> or <em> rather than visual tags like <b> or <u>.
Download the index.html file of lesson 7 and open it with your browser. You will see the document built on lesson 6 with bold, italic, and underlined formatting.
Creating Hyperlinks in HTML
A link, or hyperlink, is a way to navigate between web pages on the internet. In HTML, a link is created using the <a> tag, which stands for “anchor”. The <a> tag is used to define the start and end of a link, and the href attribute is used to specify the destination of the link.
Here’s an example of a basic HTML link:
<a href="https://www.example.com">This is a link</a>
When this link is clicked, the user’s web browser will navigate to the URL specified in the href attribute (in this case, “https://www.example.com”). The text between the <a> and </a> tags (in this case, “This is a link”) is what the user will see and click on.
You can also use the target attribute to specify how the link should be opened. For example, you can use target=”_blank” to open the link in a new tab or window.
<a href="https://www.example.com" target="_blank">This is a link that opens in a new tab</a>
In addition to linking to other web pages, you can also use the <a> tag to create links within the same page. This is known as an “anchor” link, and it’s created by using the id attribute to give an element a unique name and then using that name as the destination of the link.
Here’s an example:
<h1 id="section1">This is a heading</h1>
<p>Here's a link to <a href="#section1">the heading above</a></p>
When this link is clicked, the user’s web browser will jump to the element with the id of “section1” (in this case, the <h1> heading). This can be useful for creating a table of contents or for allowing users to quickly navigate to different sections of a page.
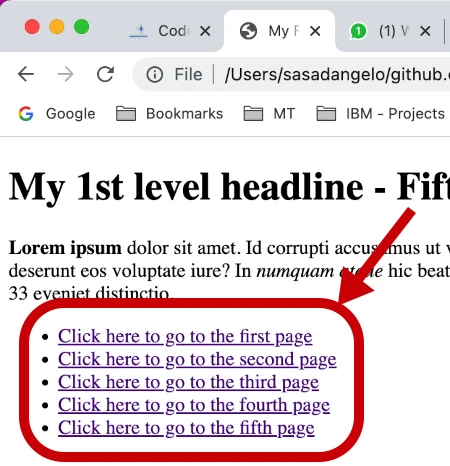
In lesson 08 I added four new HTML files similar to index.html. Navigation through the five pages is accomplished by five links placed at the beginning of each file using code like this.
<a href="index.html">Click here to go to the first page</a><br/>
<a href="second_page.html">Click here to go to the second page</a><br/>
<a href="third_page.html">Click here to go to the third page</a><br/>
<a href="fourth_page.html">Click here to go to the fourth page</a><br/>
<a href="fifth_page.html">Click here to go to the fifth page</a><br/>
Creating Lists with HTML: Ordered and Unordered Lists
HTML provides two types of lists for displaying content: ordered lists and unordered lists.
An ordered list is created using the <ol> element and is used to display a list of items in a specific order. Each item in the list is represented by a <li> element and is automatically numbered.
<ol>
  <li>First item</li>
  <li>Second item</li>
  <li>Third item</li>
</ol>
An unordered list is created using the <ul> element and is used to display a list of items that do not need to be in a specific order. Each item in the list is represented by a <li> element and is typically displayed with bullet points.
<ul>
  <li>First item</li>
  <li>Second item</li>
  <li>Third item</li>
</ul>
You can also nest lists within lists by using <ol> or <ul> elements inside the <li> elements.
<ul>
  <li>First item</li>
  <li>Second item
    <ul>
      <li>Sub-item 1</li>
      <li>Sub-item 2</li>
    </ul>
  </li>
  <li>Third item</li>
</ul>
It’s worth noting that, like many other elements in HTML, lists are semantic elements, meaning they provide information about the content they contain but do not affect the appearance of the content. You can use CSS to control the appearance of lists and list items, such as changing the bullet point or numbering style.
In lesson 9 I used the unordered list to create a menu at the beginning of each page. This menu will contain the five links introduced in lesson 8. Here is the result.
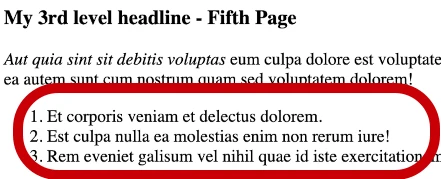
In addition, I created, randomly, an ordered list in each page. Here the result.
Enhancing Your Webpage with Images: The <img> Tag
HTML provides a way to embed images into a webpage using the <img> tag. The <img> tag is a self-closing tag, meaning it does not have a closing tag, and is used to specify the source of the image, as well as various other attributes.
The two main attributes used when adding an image to an HTML document are the src and alt attributes.
The src attribute is used to specify the URL or file path of the image file. This attribute is required for the <img> tag to function correctly.
The alt attribute is used to provide a text description of the image, which can be displayed if the image is not available or cannot be displayed for some reason. The alt attribute is also used by screen readers for accessibility purposes.
<img src="image.jpg" alt="A beautiful landscape">
As with text, even for images you can use fake images to create your website. For example, you can use the Lorem Picsum website and with a URL like this https://picsum.photos/200/300 you can create a 200x300 pixels image. If, on the other hand, you want a square image of 200 pixels just use the URL https://picsum.photos/200.
For our example website I created two to four images for each page and placed them in an img folder. In the pages, I have referenced these images with the <img> tag as shown in the example above. The result can be seen below. The source code can be found in the lesson-10 folder of our git project.

Conclusion: Building a Basic Website with HTML
In this article, we have covered the basics of building a website using HTML. We began by discussing the structure of a basic HTML document and the importance of the <head> and <body> tags. We then moved on to the different elements, tags, and attributes that are used to create the content of a web page, including headlines, paragraphs, links, lists, and images.
By following the step-by-step instructions provided in this article, you should now have a basic understanding of how to create a simple website using HTML. However, there is still much more to learn. In the next article, we will continue to build upon the skills learned here by adding quotes, and justified paragraphs and we will style our pages using CSS.
In conclusion, HTML is the backbone of any website and it is important to understand its basics and structure. With the knowledge of HTML and CSS, you will be able to create dynamic and visually appealing websites. Stay tuned for the next article where we will dive deeper into CSS and how to style our HTML documents.

