How to create your own Kubernetes cluster
Posted on 02 Mar 2020
This is the fourth article of the Getting Started with Kubernetes article series. In this article, I want to explain how I run my applications on a Kubernetes cluster using a simple project based on Vagrant and VirtualBox. In order to test the cluster, we will create a “Hello K8s” application for Kubernetes.
How to start?
Almost all the tutorials on the Internet suggest starting using Minikube, a single node version of Kubernetes whose goal is to make life easier for those approaching the platform. The problem with Minikube is that it doesn’t allow you to prove the essence of Kubernetes, that is, orchestration on multiple nodes. With Minikube you can’t see what happens to your Pods when a node goes down.
Then there are tools like Kubespray that allow you to run, thanks to virtualization tools like Vagrant and VirtualBox, a cluster with multiple nodes on your development machine. This option if it is certainly valid when you are already familiar with Kubernetes, in the beginning, it abstracts many activities and does not allow you to understand what are the components that really serve your application and how they are installed.
For this reason, I use the k8s-cluster project which allows you to create a cluster on your development machine thanks to Vagrant and VirtualBox. Here the commands to create the cluster:
git clone https://github.com/sasadangelo/k8s-cluster
cd k8s-cluster
vagrant up
Configuration
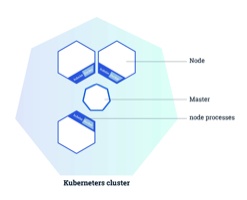
The idea behind the k8s-cluster is to have a YAML configuration file where to describe the number of desired nodes and their characteristics. By default, we have 3 nodes having 2 CPUs and 2 Gb of RAM with Ubuntu 16.04 Xenial as the operating system.
---
- name: k8s-head
  type: master
  box: ubuntu/xenial64
  box_version: 20180831.0.0
  eth1: 192.168.205.10
  mem: 2048
  cpu: 2
- name: k8s-node-1
  type: node
  box: ubuntu/xenial64
  box_version: 20180831.0.0
  eth1: 192.168.205.11
  mem: 2048
  cpu: 2
- name: k8s-node-2
  type: node
  box: ubuntu/xenial64
  box_version: 20180831.0.0
  eth1: 192.168.205.12
  mem: 2048
  cpu: 2
How does it work?
The YAML file is read by the Vagrantfile which instantiates the number of nodes on VirtualBox reported in the file with the described characteristics. Each node is then configured with three scripts:
- configure_box.sh, executed on all the cluster nodes;
- configure_master.sh, executed only on the master node;
- configure_workers.sh, executed only on the worker nodes.
Vagrantfile
The Vagrantfile is very simple because it reads the YAML file and, for each entry, generates a Server type object. It is important that the first is always the master. At this point, Vagrant loop on each Server object and instantiates a node on the VagrantBox. If the node is the master then it will execute the configure_box.sh and configure_master.sh scripts, otherwise configure_box.sh and configure_worker.sh.
require 'yaml'

# Load settings from servers.yml file.
servers = YAML.load_file('servers.yaml')

Vagrant.configure("2") do |config|
    servers.each do |opts|
        config.vm.define opts["name"] do |config|
            config.vm.box = opts["box"]
            config.vm.box_version = opts["box_version"]
            config.vm.hostname = opts["name"]
            config.vm.network :private_network, ip: opts["eth1"]

            config.vm.provider "virtualbox" do |v|
                v.name = opts["name"]
                v.customize ["modifyvm", :id, "--groups", "/K8s Development"]
                v.customize ["modifyvm", :id, "--memory", opts["mem"]]
                v.customize ["modifyvm", :id, "--cpus", opts["cpu"]]

            end

            config.vm.provision "shell", path: "configure_box.sh", privileged: true
            if opts["type"] == "master"
                config.vm.provision "shell", path: "configure_master.sh", privileged: true
            else
                config.vm.provision "shell", path: "configure_worker.sh", privileged: true
            end
        end
    end
end
configure_box.sh script
This script installs the following components on all three nodes:
- Docker engine;
- kubeadm, the tool initializes the cluster on the master node and allows other nodes joining;
- kubectl, the Kubernetes command line interface (CLI);
- kubelet.
Here the code to install the Docker engine:
apt-get update
apt-get install -y apt-transport-https ca-certificates curl software-properties-common
curl -fsSL https://download.docker.com/linux/ubuntu/gpg | apt-key add -
add-apt-repository "deb https://download.docker.com/linux/$(. /etc/os-release; echo "$ID") $(lsb_release -cs) stable"
apt-get update
apt-get install -y docker-ce=$(apt-cache madison docker-ce | grep 17.03 | head -1 | awk '{print $3}')
Then the script adds the vagrant user to the docker group, in this way it can run docker commands.
usermod -aG docker vagrant
The script installs kubectl, kubeadm, and kubelet using the following code:
apt-get install -y apt-transport-https curl
curl -s https://packages.cloud.google.com/apt/doc/apt-key.gpg | apt-key add -
cat >> /etc/apt/sources.list.d/kubernetes.list << EOL
    deb http://apt.kubernetes.io/ kubernetes-xenial main
EOL
apt-get update
apt-get install -y kubelet kubeadm kubectl
apt-mark hold kubelet kubeadm kubectl
swapoff -a
sed -i '/ swap / s/^\(.*\)$/#\1/g' /etc/fstab
IP_ADDR=`ifconfig enp0s8 | grep Mask | awk '{print $2}' | cut -f2 -d:`
echo "KUBELET_EXTRA_ARGS=--node-ip=$IP_ADDR" | tee -a /etc/default/kubelet
systemctl restart kubelet
configure_master.sh script
This script performs the following actions:
- initialize the cluster;
- configure vagrant user to use kubectl commands;
- install the Calico network plugin;
- generate the join script to run on the worker nodes;
- configure ssh to allow password authentication.
This is the code to initialize the cluster:
IP_ADDR=`ifconfig enp0s8 | grep Mask | awk '{print $2}'| cut -f2 -d:`
HOST_NAME=$(hostname -s)
kubeadm init --apiserver-advertise-address=$IP_ADDR --apiserver-cert-extra-sans=$IP_ADDR  --node-name $HOST_NAME --pod-network-cidr=172.16.0.0/16
The second step configures the vagrant user to use kubectl commands:
sudo --user=vagrant mkdir -p /home/vagrant/.kube
cp -i /etc/kubernetes/admin.conf /home/vagrant/.kube/config
chown $(id -u vagrant):$(id -g vagrant) /home/vagrant/.kube/config
The third step installs the Calico network plugin:
export KUBECONFIG=/etc/kubernetes/admin.conf
kubectl apply -f https://raw.githubusercontent.com/sasadangelo/k8s-cluster/master/calico/rbac-kdd.yaml
kubectl apply -f https://raw.githubusercontent.com/sasadangelo/k8s-cluster/master/calico/calico.yaml
Then the script generates the joining script to run on the worker nodes:
kubeadm token create --print-join-command 2>/dev/null | tee -a /etc/kubeadm_join_cmd.sh
chmod +x /etc/kubeadm_join_cmd.sh
Finally, the script configures ssh to enable password authentication:
sed -i "/^[^#]*PasswordAuthentication[[:space:]]no/c\PasswordAuthentication yes" /etc/ssh/sshd_config
service sshd restart
configure_worker.sh script
On the worker node, the only step performed is a copy of the joining script from the master node and its execution to let the worker node join the cluster.
apt-get update
apt-get install -y sshpass
sshpass -p "vagrant" scp -o StrictHostKeyChecking=no vagrant@192.168.205.10:/etc/kubeadm_join_cmd.sh .
sh ./kubeadm_join_cmd.sh
Control the cluster from your laptop
Currently to manage the cluster you need to access your Vagrant machines via ssh to use kubectl commands. You can avoid this installing kubectl on your local machine and use it to control your cluster.
To do that you need to install kubectl on your machine following this guide. Then you need to copy the Kubernetes credentials from your remote host:
cd ~
scp -r vagrant@192.168.205.10:/home/vagrant/.kube .
Running the kubectl get pods command, you should see the cluster nodes.
How to create a “Hello K8s!” application
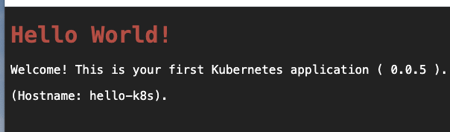
This is your first Kubernetes “Hello World” application. It is an Nginx web server that listens on 80 port and when you connect to it with your browser the “Hello World!” message will appear with hostname and image version. This will be useful to understand which Pod responded to a browser request and its hostname and which version is currently in use.
In the following article, I created a Hello World application for Docker that we will reuse for Kubernetes with small changes. Here the Dockerfile.
FROM ubuntu:16.04
RUN apt-get update; apt-get install -y nginx php7.0 php7.0-gd php7.0-mysql php7.0-curl vim
COPY nginx.conf /etc/nginx/nginx.conf
COPY ./www-data /home/www/www-data
COPY entrypoint.sh .
COPY VERSION .
COPY VERSION /home/www/www-data
EXPOSE 80
ENTRYPOINT /entrypoint.sh
As you can notice, in this Dockerfile we install PHP in addition to Nginx to run the index.php file in the www-data folder. The reason why we use a PHP file instead of an HTML one is that we want to print the version of the application and the hostname in order to know which version of the application we are running and on which Pod.
The ENTRYPOINT of the Docker container is the entrypoint.sh script that set the right permission for the /var/log/nginx folder and it will start the php7.0-fpm and the nginx services. You can check out the source code here.
The docker image of this application is now on my Docker Hub account sasadangelo/hello-k8s.
How to run the “Hello K8s!” application
Kubernetes allows running a containerized application in three approaches: generators, imperative, and declarative. The first two methods are achieved via kubectl CLI while the third method is achieved declaring the desired state in a YAML configuration file. In all the cases, the result is this.
Let’s analyze all these methods in detail.
Generators
This is the easiest method and it is achieved using the kubect run and kubectl expose commands. It is useful when you want to run a quick test just to check if the application works. Since no deployment is created behind the scene you cannot scale the Pod.
The command to run the application is:
kubectl run hello-k8s --generator=run-pod/v1 --image=sasadangelo/hello-k8s:latest --port=80
Check if the Pod is running typing the kubectl get pods command. In order to connect with the browser from your host machine, you need to expose the Pod via Service using the following command:
kubectl expose pod hello-k8s --type=NodePort --port=80
You can type now in your browser the URL ÌP:PORT, where IP is the 192.168.x.x address of one of the two worker nodes (k8s-node-1 or k8s-node-2) and PORT is the one you get typing the command:
kubectl describe service hello-k8s | grep NodePort
Clean up the configuration using the commands:
kubectl delete service hello-k8s
kubectl delete pod hello-k8s
Imperative
This method is achieved using the commands kubect create and kubectl expose. The first command creates a deployment behind the scene so you can scale the Pos as you prefer. The command to deploy and run the application is:
kubectl create deployment hello-k8s --image=sasadangelo/hello-k8s:latest
Check if the Deployment is created and the Pod is running typing the kubectl get deployments and kubectl get pods commands.
kubectl get deployments
kubectl get pods
In order to connect with the browser from your host machine you need to expose the Deployment via Service using the following command:
kubectl expose deployment hello-k8s --type=NodePort --port=80
You can type now in your browser the URL ÌP:PORT, where IP is the 192.168.x.x address of one of the two worker nodes ( k8s-node-1 or k8s-node-2 ) and PORT is the one you get typing the command:
kubectl describe service hello-k8s | grep NodePort
Scale the application to 5 pods with the following commands:
kubectl scale --replicas=5 deployment.apps/hello-k8s
See the 5 pods running using the kubectl get pods command. If you type your browser Reload button continuously you can notice sometimes the hostname change because different pods will respond. Attention!!! It could be possible you have to type the Reload button a lot of time before see the hostname change due to Pod affinity.
Clean up the configuration using the commands:
kubectl delete service hello-k8s
kubectl delete deployment deployment.apps/hello-k8s
Declarative
This method is achieved using the commands kubectl apply. This command uses a deployment file where is defined as the deployment and the service resource objects.
The command to deploy and run the application is:
kubectl apply -f https://raw.githubusercontent.com/sasadangelo/k8s-tutorials/master/hello-k8s/deployment.yml
You can see 5 pods running using the kubectl get pods command. You can type now in your browser the URL ÌP:PORT, where IP is the 192.168.x.x address of one of the two worker nodes ( k8s-node-1 or k8s-node-2 ) and PORT is the one you get typing the command:
kubectl describe service hello-k8s-service -n hello-k8s-ns | grep NodePort
Clean up the configuration using the commands:
kubectl delete service hello-k8s-service -n hello-k8s-ns
kubectl delete deployment hello-k8s-deployment -n hello-k8s-ns
kubectl delete namespace hello-k8s-ns
Final Thoughts
In this article, we started playing with Kubernetes creating our own cluster and deploy a “Hello World” application using different approaches. In the next articles, we will explore more on Kubernetes running more complex applications.

