Android Graphics Programming for Games
Posted on 21 Jul 2019
This is the tenth article of the Android Game Programming series. In this article, I will talk about android graphics programming and how to use it to implement our video game.
How to draw a bitmap
Bitmap management in Android must be done with caution to ensure that the application’s user interface is responsive and avoid to exceed the system’s memory limits. If the application and its images are not sized correctly, the risk of application crash due to errors such as:
java.lang.OutofMemoryError: bitmap size exceeds VM budget.
is high. The reasons why bitmap management on mobile devices is not trivial are the following:
- Mobile devices typically have limited resources. They can even have only 16MB of memory available for a single application. The Android Compatibility Definition Document (CDD), in Section 3.7 “Virtual Machine Compatibility” provides the minimum memory requirements for applications based on screen size and density. Applications should be optimized to run correctly within these limits. However, remember that many devices are configured with slightly higher limits.
- Bitmaps require a lot of memory, especially if they are photos. For example, the Galaxy Nexus camera takes photos up to 5 Megapixels (resolution 2592×1936). If the bitmap is configured to be used in ARGB_8888 mode (the default from Android 2.3 onwards) then loading the image into memory would require about 19MB of memory running out of available memory for the application on some devices.
Android applications often require the upload of multiple images.
In our case, however, the images we will use are simple bitmaps that will not take up much space in memory, so we will not have big problems from this point of view. The biggest problem will be how to load these images efficiently to prevent the application from becoming unresponsive.
View and ViewGroup classes in Android
The View class represents the basic element of any user interface in Android. A View is a rectangular area responsible for its rendering and to manage user inputs when you touch it. It is the base class for all widgets like buttons, text field, etc. It’s possible to combine more View aggregating them through the ViewGroup class. All Layouts in Android derive from the class ViewGroup.
The following image shows the relationship between the View, ViewGroup, and Layout classes. The first two classes form the so-called Composite Pattern, a mechanism to organize different objects (ex. buttons, text field, etc.) in complex user interfaces.
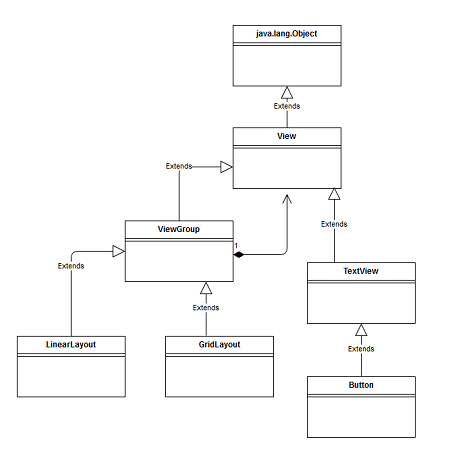
In the implementation of our video game, we will not use the Android standard interface, so we won’t use ViewGroup and the Layout classes, but we’ll draw it by ourself through the mechanisms of the View and SurfaceView classes.
The most important method of the View class is the onDraw method that is invoked when you have to draw the object on the screen. The method takes in input a Canvas object which is the space on which we’re going to draw our bitmaps.
How to draw a bitmap on the screen
In this section, we will see how to draw a bitmap on the screen. We will modify the MyActivity class adding the inner class AndroidFastRenderView which extends the View class.
The idea is to use a View object that occupies the size of the whole screen on which to draw our bitmap. In the constructor of this class, we will put the code to load the bitmap that we have already seen in the previous article. In the onDraw method, instead, we will implement the bitmap rendering code.
public class MyActivity extends Activity {
    class AndroidFastRenderView extends View {
        Bitmap startscreenBitmap;
        Rect dst = new Rect();

        public AndroidFastRenderView(Context context) {
            super(context);
            InputStream inputStream = null;
            try {
                FileIO fileIO = new AndroidFileIO(getAssets());
                inputStream = fileIO.readAsset("startscreen.png");
                startscreenBitmap = BitmapFactory.decodeStream(inputStream);
            } catch (IOException e) {
            } finally {
                    if (inputStream != null) try { inputStream.close(); } catch (IOException e) {}
            }
        }

        protected void onDraw(Canvas canvas) {
            width=540; // metti qui l'ampiezza dello schermo del tuo telefonino
            height=960; // metti qui l'altezza dello schermo del tuo telefonino
            dst.set(0, 0, width, height);
            canvas.drawBitmap(startscreenBitmap, null, dst, null);
            invalidate();
        }
    }

    public void onCreate(Bundle savedInstanceState) {
        super.onCreate(savedInstanceState);
        requestWindowFeature(Window.FEATURE_NO_TITLE);
        getWindow().setFlags(WindowManager.LayoutParams.FLAG_FULLSCREEN,
        WindowManager.LayoutParams.FLAG_FULLSCREEN);
        setContentView(new AndroidFastRenderView(this));
    }
}
As you can see from the code, the bitmap is drawn on the video using the drawBitmap method of the Canvas class. The size of my screen mobile phone is 540×960, you can change the values based on the size of your screen. Later in the book, we will see how to adapt the bitmap to any screen. The invocation of invalidate() method will force the drawing of the bitmap. In the onCreate() method of MyActivity, we set a full-screen window without a title and on this will set our view as content.
To execute the code you can follow the procedure seen in paragraph 1.4. The source code the exercise can be found here.
Load the bitmap efficiently
There are many techniques for efficiently loading images into memory. For example, using the Android API it is possible to make an estimate of its size in memory e load it only if there is enough space. If there is not enough space then a resized version is loaded. For more details on these techniques and other recommendations see this section of the Android Developers website. For our intent, the only technique we need to analyze is how to manage the image upload efficiently using a different thread than the one we use to manage our UI.
For our goals, the only technique we need to analyze is how to upload image efficiently using a different Thread by the one we use to manage the rest of our game.
The Android SurfaceView class
This class extends the Android View class and provides a dedicated surface on which to draw. It is possible to check the format and size of the surface; the class will place the surface correctly on the screen.
Access to the surface to be drawn via the SurfaceHolder interface, which can be got by invoking the getHolder() method. One of the reasons we will use this class is that it allows the rendering of the screen using a separate thread. The use of this thread will allow us to separate screen rendering from user input processing. The final effect you will get is a much more responsive user interface.
We will call Main Thread the main thread of our application and UI Thread the one that will take care of the rendering. In order for the UI thread to draw on the surface, it is important to check that it is valid. To do this we will use the isValid() method of the SurfaceHolder class.
Also, before to be able to draw on the surface, to avoid race conditions, it will be necessary to control it in exclusive by invoking the SurfaceHolder lockCanvas() and unlockCanvas() methods. This is an example of a code that should be used to draw on the surface:
if(!holder.getSurface().isValid())
    continue;
Canvas canvas = holder.lockCanvas();
canvas.getClipBounds(dstRect);
// draw something
holder.unlockCanvasAndPost(canvas);
How to draw a bitmap on the screen using the UI Thread
Now let’s see how to change the code above to get the same result using the UI Thread. The inner class AndroidFastRenderView extends SurfaceView and is Runnable so that an external thread can execute its run method.
The constructor loads the bitmap startscreen.png as already seen above. The main thread invokes the resume() and pause() methods to start or pause the UI thread whenever the application starts or pauses. The most important part is the run() method. As you can see, when the thread is running, it executes a cycle that will draw the scene if and only if the surface is valid. Then the surface is exclusively reserved for the UI Thread to design over it.
This cycle that we see in the run method is very important because, as we will see in the following exercises, it will become our Game Loop.
public class AndroidFastRenderView extends SurfaceView implements Runnable {
    Bitmap startscreenBitmap;
    Rect dst = new Rect();
    Thread renderThread = null;
    SurfaceHolder holder;
    volatile boolean running = false;

    public AndroidFastRenderView(Context game, Bitmap framebuffer) {
        super(game);
        this.holder = getHolder();
        InputStream inputStream = null;
        try {
            FileIO fileIO = new AndroidFileIO(getAssets());
            inputStream = fileIO.readAsset("startscreen.png");
            startscreenBitmap = BitmapFactory.decodeStream(inputStream);
        } catch (IOException e) {
        } finally {
            if (inputStream != null) try { inputStream.close(); } catch (IOException e) {}
        }
    }

    public void resume() {
        running = true;
        renderThread = new Thread(this);
        renderThread.start();
    }

    public void run() {
        Rect dstRect = new Rect();
        while(running) {
            if(!holder.getSurface().isValid())
                continue;
                Canvas canvas = holder.lockCanvas();
                canvas.getClipBounds(dstRect);
                canvas.drawBitmap(startscreenBitmap, null, dstRect, null);
                holder.unlockCanvasAndPost(canvas);
            }
        }
    }

    public void pause() {
        running = false;
        while(true) {
            try {
                renderThread.join();
                break;
            } catch (InterruptedException e) {
                // retry
            }
        }
    }
}
The MyActivity class will not be very different from the code above, the only difference is the framebuffer allocation and the management of screens of any size.
We have already explained the idea of the framebuffer, here I just want to emphasize that its size is fixed for a resolution of 320×480 and will depend from the orientation of the device (landscape or portrait). The reason why we set the 320×480 resolution is that it will be a reference resolution. Knowing the real resolution of the device we will be able to calculate the scale factors for the coordinates X, Y that we will then apply each time we are going to draw objects on the framebuffer. We’ll see better this aspect later.
public class MyActivity extends Activity {
    AndroidFastRenderView renderView;

    public class AndroidFastRenderView extends SurfaceView implements Runnable {
        Bitmap startscreenBitmap;
        Rect dst = new Rect();
        Thread renderThread = null;
        SurfaceHolder holder;
        volatile boolean running = false;

        public AndroidFastRenderView(Context game, Bitmap framebuffer) {
            // …
        }
    }

    @Override
    public void onCreate(Bundle savedInstanceState) {
        super.onCreate(savedInstanceState);
        requestWindowFeature(Window.FEATURE_NO_TITLE);
        getWindow().setFlags(WindowManager.LayoutParams.FLAG_FULLSCREEN,
        WindowManager.LayoutParams.FLAG_FULLSCREEN);
        boolean isLandscape = getResources().getConfiguration().orientation ==
        Configuration.ORIENTATION_LANDSCAPE;
        int frameBufferWidth = isLandscape ? 480 : 320;
        int frameBufferHeight = isLandscape ? 320 : 480;
        Bitmap frameBuffer = Bitmap.createBitmap(frameBufferWidth,
        frameBufferHeight, Bitmap.Config.RGB_565);
        renderView = new AndroidFastRenderView(this, frameBuffer);
        setContentView(renderView);
    }

    @Override
    public void onResume() {
        super.onResume();
        renderView.resume();
    }

    public void onPause() {
        super.onPause();
        renderView.pause();
    }
}
To execute the code you can use this procedure. The code of this exercise can be found here.
Bitmap Configuration
A bitmap is, as easy to guess, a pixel matrix. The way pixels are memorized affects its quality or size. It’s obvious that a method of storing pixels that safeguards quality will go to detriment of the use of memory and vice versa. In Android there are essentially 4 ways to store a bitmap:
- ALPHA_8, each pixel is stored as a single translucency channel (alpha).
- ARGB_4444, this mode is deprecated starting from the API level 13, due to the poor level
image quality. It is advisable to use ARGB_8888. - ARGB_8888, each pixel is stored on 4 bytes, one for each channel (R, G, B, and ALPHA).
- RGB_565, each pixel is stored on 2 bytes storing only the RGB channels: R is stored on 5 bits (32 possible values), G is stored on 6 bits (64 possible values) and blue is stored on 5 bits.
ARGB_8888 mode favors quality over memory allocation, vice versa for RBG_565. Moreover, the latter will not allow drawing bitmaps in translucency, so it will not be suitable to memorize sprite whose background color must blend with the video game background.
Gdx Class
You will need to access the MyActivity class in different parts of the code in order to get references to the various subsystems of the framework such as the graphic, file management, and so on. In our application, we will need only one MyActivity instance so it would make sense to manage it as a Singleton. This would also allow us to avoid having to pass this class as a parameter at different points in the code. Unfortunately Android does not allow us to create Activity-type objects on our own so the Singleton solution is not practicable. For this reason, we introduce the static class Gdx:
public class Gdx {
    public static MyActivity game;
    public static Graphics graphics;
    public static FileIO fileIO;
}
which will have a static reference to the main activity of the game and a reference for each subsystem. Software design purists will turn up their noses, but among the possible alternatives, this is certainly the least bad. In the onCreate() method of the MyActivity class we will add the following 3 lines of code:
public void onCreate(Bundle savedInstanceState) {
        ...
    Gdx.graphics = graphics;
    Gdx.fileIO = fileIO;
    Gdx.game = this;
}
At any point in the code to access the graphics subsystem or files just write:
Gdx.graphics
Gdx.fileIO

