
How to create an Android application
Posted on 14 Sep 2018
This is the third article of the Android Game Programming series. Here I would like to explain, step by step, how to create your first Android application. It will be the starting point for the development of your first Android video game.
Create your first Android application
In the previous article, I showed you how to download and install Android Studio on your machine so that we can use it to create our first “Hello World” application. To do that you will need to perform the following steps.
To create a new project in Android Studio:
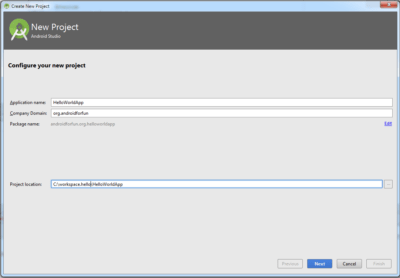
The New Project panel will appear. This project will contain all the source codes of your future Android application. Complete the panel and press Next.
If you will use the values, it will be easier for you to follow this article.
- Application Name is the name of your application that will be “HelloWorldApp” for this project.
- Company domain is a qualifier that will be the beginning part of the package name. The term “package name”, if you already know Java, should be self-explanatory. Enter the value androidforfun.org.
- Project location will be the folder that will contain your project (<workspace>\HelloWorldApp).
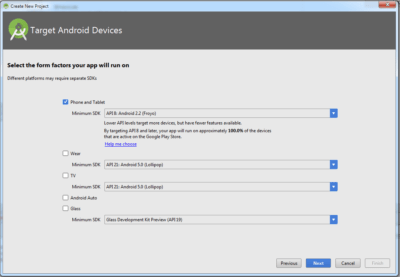
Under Select the form factors your app will run on, select the Phone and Tablet check box. In Minimum SDK, select API 8: Android 2.2 (Froyo). The reason why I let you choose this SDK is that with it your application will work on many devices.
Leave all other checkboxes (TV, Wear, and Glass) unchecked, and press Next.
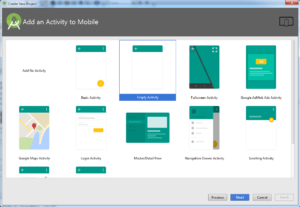
On the Add an activity to Mobile panel, select Empty Activity and click Next.
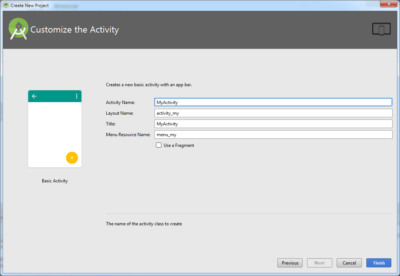
In the Customize the Activity panel, change the Activity Name in MyActivity. Automatically Layout Name will be changed in activity_my, the field Title in MyActivity and the menu Resource Name will be menu_my. Click on Finish to create the project.
You have finally created the project for your first “Hello World” application.
“Hello World” application project files
The project created in the previous section will contain some default files that we will now examine in detail. We will only see those that are useful for our goals.
app/src/main/res/layout/activity_my.xml
This XML file represents the main activity of our application. Android Studio allows you to change this file either textually or graphically. The file defines some basic interface elements for our application such as a bar, a button, etc.
app/src/main/java/org.androidforfun.helloworldapp/MyActivity.java
This is the main Java class of our application. It represents the main activity.
app/src/main/AndroidManifest.xml
It is the manifest file of the application that describes some main characteristics and its components.
app/build.gradle
Android Studio uses Gradle to compile and package applications. We will not touch this file and we will automatically manage it from Android Studio.
There is a folder /res that contains the resources of your application.
- drawable/
Contains bitmaps required for the application. - layout/
Contains the activity_my.xml file where the layout of your application is described. - values/
Directory for other XML files that contains a collection of resources, such as strings and color definitions.
Before trying to run the application remove the <workspace>\HelloWorldApp\app\src\androidTest folder from the file system because it is useless for our purposes. Sync files to Android Studio by going to the Android TAB on the left and right clicking on the app and selecting Synchronize ‘app’. If you want you can download the code for this exercise at this link.
Choose Physical or Virtual Device
To run your application on Android you have two possibilities:
- install the application on a physical device;
- install the application on a virtual device.
Regardless of the method you choose, you can launch your application directly from Android Studio.
- If you use a physical device, connect it to your computer using a USB cable. If you use Windows you will probably need to install the drivers for it. At this point, you will need to enable USB Debugging mode that on many devices from 3.2 up to 4.0 (excluded) is in Settings>Applications>Development. On devices from Android 4.0 and later, you’ll find them in Settings>Developer Options. On Android 4.2 and later the option is hidden by default. To make it reappear, go to Setting->Info on the device and tap Version Build 7 times, the option will become visible.
- If you do not have a physical device or simply want to try the application on a device with features that your physical device does not have, you can run the application on a virtual device. From Android Studio you can create an Android Virtual Device (AVD). An AVD is a device configuration that the Android emulator interprets to provide you with the device you want on-screen.
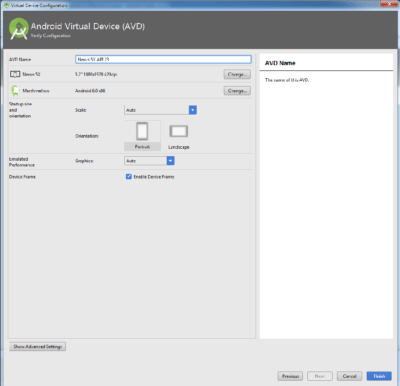
Create an Android Virtual Device
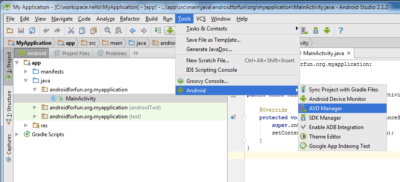
Now let’s see how to create an AVD and then run our application on it. In Android Studio, select Tools>Android>AVD Manager, or click the AVD Manager icon in the toolbar.
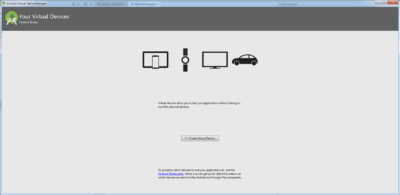
The AVD Manager panel will appear. On the AVD Manager main screen, click Create Virtual Device.
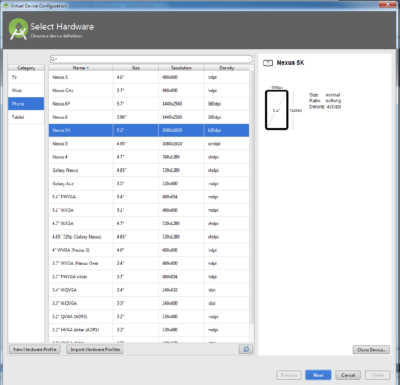
In the Select Hardware window, select a device configuration, such as Nexus 5, then click Next.
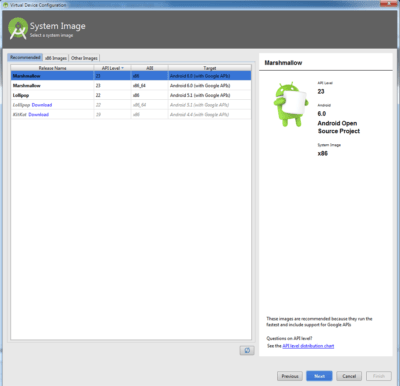
Select the desired Android version for AVD and click Next.
Check the configuration and click Finish.
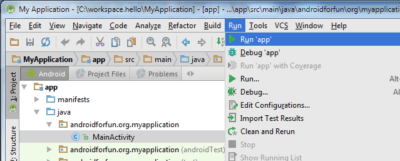
Run your Android application
At this point, regardless if you have chosen to run your application on a physical or virtual device, you will be ready to run your application from Android Studio. To do this, select a project file and click on Run in the menu.
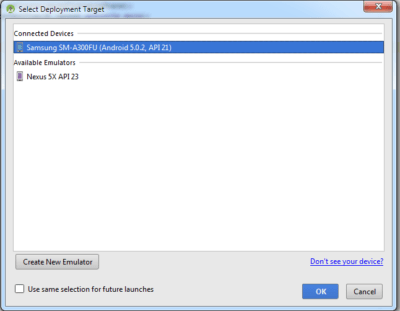
The Choose Device window will appear, choose if you want a physical or virtual device and click OK. Android Studio will install the application and run it.
You have finally created and run your first Android application from this moment you will begin to add features to it until you create your first video game.
What’s next?
Now that you have learned how to create your first Android application, it’s time to write your first video game. Before that, on Windows system, it’s important to install Intel x86 Emulator Accelerator (HAXM) following the procedure described in the next article.

