Android Programming for Games (Activity Lifecycle)
Posted on 01 Dec 2018
This is the seventh article of the Android Game Programming series. In this article, I will introduce a basic android programming concept: the activity lifecycle.
What is an Activity?
Activity is one of the Android programming key concepts. It allows the user to interact with an application, such as making a phone call, take a picture, send an email, or view a map.
Each Activity provides a window in which it draws the user interface. This window typically fills the screen but maybe smaller or stay on top of other windows. An application can have one or more activities that the user can navigate. The main activity is the most important activity for an application.
Activity Status
An Activity is basically a state machine with the following states: running, stopped, paused, started, created, and destroyed.
When a user uses the Home, Back and Recent Apps buttons, activities simply shift from one state to the other. This is the Activity Lifecycle.
For example, if we launch WhatsApp, its main activity will appear on the screen. If the user presses the Home button, it pauses and then stops. The activity window disappears from the screen and the phone’s main screen will appear.
If the user starts Facebook, it will become the new foreground application. The user can decide to press the Recent apps button and restore WhatsUp.
For each state change (creation, pause, ready, destroy, etc.), Android provides a Java callback where application code can be inserted to manage that specific event. In a normal Java program, the execution starts from the static main method. On Android, things work differently because everything starts from the main activity. In order to understand how to program this activity, it is necessary to understand how its life cycle works.
Activity Lifecycle
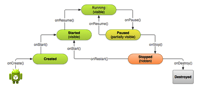
Activity State Diagram
The easiest way to understand an activity’s life cycle is to look at its state diagram and what methods are invoked passing from one state to another.
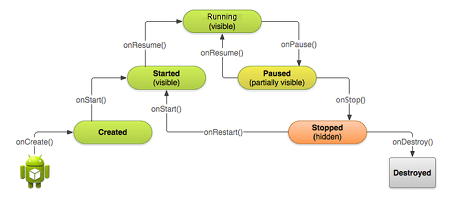
Photo from https://developer.android.com
In the photo, you can see the activity state diagram. It looks like a pyramid with Running state at the top. Although it depends on the complexity of an application, it is generally not required to implement all the methods for the different states.
It is important that you learn the meaning of each one so that the application behaves as you expect:
- it does not crash if the user receives a call or switches to another application;
- the application does not consume too many resources if the user is not using it;
- the user’s progress is not lost if he leaves the application to come back later or changes from landscape to portrait mode.
Activity Callbacks
When the user starts an application the main activity is created, the onCreate method is invoked and the activity goes into the Created state. In the onCreate method, you usually enter some code to run only when the application is created. This method will no longer be invoked for the duration of the activity execution.
When the activity has been created immediately it passes to the Started state and the onStart method will be processed. The substantial difference between the Created and Started status is that the former will only be traversed once in the activity life cycle, instead, the latter will be traversed both when the activity starts and when it returns to the foreground after it had been stopped.
From the Started state the activity immediately goes to the Running state by invoking the onResume method. In all the states seen so far, the activity is always visible in the foreground. If the user starts another application, then it passes into the Paused state and the onPause method is invoked. At any time the user can re-run the application and resume it from the interruption point. The activity will return to Running and the onResume method will be invoked.
From the Paused state the application can be stopped and the application goes into Stopped state and the onStop method will be invoked. In general, an application is stopped when it is no longer visible, unlike when it is paused it is partially visible.
Usually, in the onPause callback you enter the code for:
- stop animation or other actions that could consume CPU.
- Commit changes not yet saved.
- Release resources that could consume resources (i.e. the battery).
From the Stopped state the application can start again and the onRestart method will be invoked, or the application will end and in the final state Destroyed the onDestroy method will be invoked. Generally, the onDestroy method is used to free the resources allocated by the activity and thus avoid leaks (that is, portions of memory not released). Often, however, the onDestroy method remains empty because it is assumed that resources will be freed when the application is closed, however it is always wise to free up the allocated resources to avoid problems.
There are some key scenarios in which your activity is stopped and restarted:
- the user opens the Recent Apps window and switches from one application to another.
- The current foreground activity will be stopped. If the user then returns to the first application again via Home or Recent Apps the application will be restarted.
- The user performs an action that starts a new activity. The old activity will be stopped and the new one will start. If the user presses the Back button, the first activity will be restarted.
- The user receives a phone call while using the application.
Unlike the onPause method, the onStop method should be used to perform shutdown operations that are CPU intensive, such as writing data to a database.
To specify the main activity of an app, you must modify the AndroidManifest.xml manifest file this way.
<activity android:name=".MainActivity" android:label="@string/app_name">
    <intent-filter>
        <action android:name="android.intent.action.MAIN" />
        <category android:name="android.intent.category.LAUNCHER" />
    </intent-filter>
</activity>

