
Beginner’s Guide to AWS Identity and Access Management (IAM)
Posted on 09 Mar 2021
After the AWS Introduction of the previous article, let’s start exploring one of the main AWS components: AWS Identity and Access Management (IAM). You will learn what it is and how to create and manage your account in order to start using AWS.
In this article, there is a hands-on tutorial that will help you to register your account, configure it using well-known best practices, and start using it to deploy your IT infrastructure.
Why we need Identity and Access Management?
I am old enough to remember the first years of the digital era when usually one computer exist in an office, there was only one account sometimes not protected by any password. The most secure systems had a single account with a single password shared across multiple people. This password was easy to remember, sometimes the name of a person, its nickname, his birth date, and so on. In the early ’90, at the beginning of the Internet era, stole a password was an easy task and unauthorized people could access easily the information they were not entitled to. Security became a must and new methods to secure a system started to be used.
AWS Identity and Access Management (IAM) is an AWS service responsible to verify the identity of a person and if he is entitled to access the AWS resources he requests.
Identity and Access Management Basic Concepts
User, Group, and Role
User: is a permanently named operator who accesses the system or data. He can be a human or a machine that runs automation. This user has permanent credentials for the entire lifecycle and will change only in credentials rotation or user removal. These credentials will authenticate the user into the system and they can be, for example, username and password, keys, certificates, and so on.
Group: a group is a collection of users. Moreover, a user can belong to multiple groups (see Charles and David in the figure below). For this reason, it is an NxM relationship. Examples of groups are developers, auditors, operations, and so on. It is possible to have users that don’t belong to any group (see Fred in the figure below). Groups cannot be nested.

Role: in the technology world when we think about a role usually we immediately think of the user permissions. However, this is not true in AWS. In fact, a Role in AWS is an authentication method, a way to identify a human or a machine into the system. The main difference with a user is that his credentials are temporary and he cannot be part of a group.
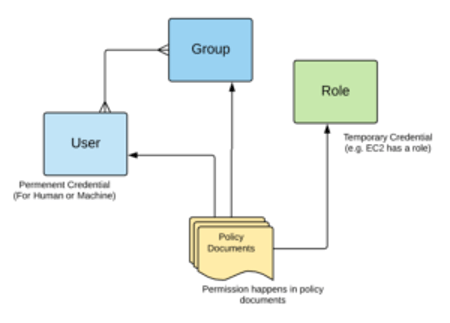
Photo from AWS Cloud Practitioner Essentials (2nd Edition) course
Policy Documents
A Policy Documents is a JSON file that contains the permission information. In fact, associations between Policy Documents and the User, Group, and Role define how these entities access the AWS resources. Everything in AWS works with API calls, for each of them, you can define who (User, Group, or Role) is entitled to do it and the granularity. Permissions in Policy Documents uses a white list approach, everything is denied unless not specifically authorized by the administrator. IAM uses the least privilege principle. A group policy is automatically valid for all the users belonging to it.
The following is a typical structure of a Policy Document:
- Version, the document version.
- Id, optional policy identifier.
- Statements, a document can have one or more statements each one describing what an entity (user, group, role) can do on an AWS resource.
- Sid, optional statement identifier.
- Effect, allow or deny.
- Principal, the user, group, or role to which the statement applies.
- Actions, actions on the AWS resources.
- Resources, the AWS resources to apply the actions to.
Identity and Access Management Example Scenario
Suppose the organization example.com has the administration account research@example.com. The organization has an S3 bucket where there are all the customer bills. Mario is an example.com employee and needs to save a bill on that bucket. Here the workflow:
-
- Mario uses his credentials to authenticate on the account. He is entitled by the example.com administrator to write on the S3 bucket.
- He gets from Security Token Service (STS) temporary security credentials to writing on the S3 bucket.
- Mario stores via Console the file on the S3 bucket, behind the scene an API call occurs. The API call contains information about Mario. In conclusion, the IAM engine will check the resource Policy Documents to make sure Mario can perform the operation.
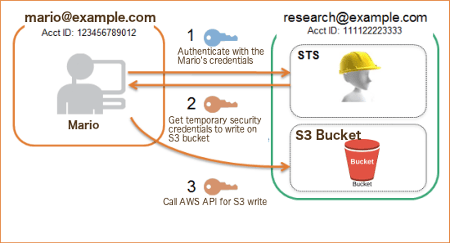
Photo from AWS Cloud Practitioner Essentials (2nd Edition) course
At the end of the process, you’ll find all the authentication and authorization processes in Cloud Trail for auditing.
Identity and Access Management Best Practices
The account management of your organization requires the use of some best practices:
- Use root account only for initial setup. Don’t share the credentials.
- Each person has 1 user account. Don’t share a user account among multiple people.
- Assign users to groups so that it’s easy to assign permissions to groups of people with the same job role.
- Setup password policy (strong password, password rotation, avoid password re-use, etc.).
- Use and enforce the Multiple Factor Authentication (MFA). The use of MFA is a must for the root account.
- Each user must create an Access Key and Access Secret Key if he must access AWS resources via CLI/SDK. Never shared Access Keys and Access Secret Key.
- Never create Access Key and Access Secret Key for the root user.
- Use Role to give permissions to AWS Resources.
Access Key and Access Secret Key
It’s a security best practice to associate with each user an Access Key and an Access Secret Key to access resources programmatically or via tools (i.e. AWS CLI). Usually, it’s true these relationships:
- Access Key = user name
- Access Secret Key = password
Since Access Key is not mnemonic it is a combination of complex letters, numbers, and symbols. The practice to use these additional credentials is to avoid that credentials stolen via phishing can be used in automation and vice-versa. Moreover, this avoids writing account credentials on a machine even in a secure way.
Multi-Factor Authentication
In recent years, Multi-Factor Authentication is widely used for your Bank account but also to protect your social account, and other use cases. The basic idea is to associate something you know (Password) to something you possess (Device) to protect your account.
- MFA Authentication = Password + Code on your Device
You enter your password into your system, and after verifying the password send you a code on a previously registered device you have to enter to complete the registration. In this way, if a hacker stole your password the account is not compromised.
Multi-Factor Authentication is a must for the root account.
Hands-On Lab: How to Setup your AWS account
The following are the steps to create your AWS account and apply the best practices to manage it.
Register your AWS account
People who want to use AWS must create an account, you can follow the instruction to register here. It’s a typical registration process with no particular difficulty. The important thing to know are the following:
- you have to select the 12 Months Free Tier Plan so you can play with the platform at no cost, obviously, there are limitations;
- enter your credit card. Amazon will charge you 1$ that will be refunded to make sure the card is valid.
- you will create a root account that you should only use for initial setup and never share with anyone.
Create an Administrator for your AWS account
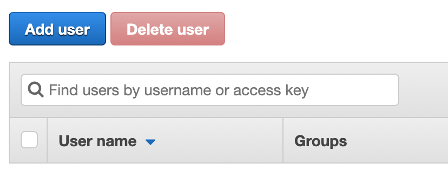
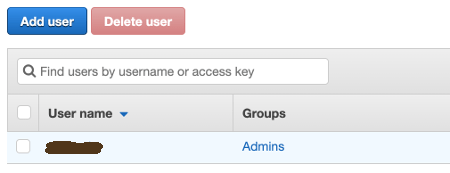
Sign in to the AWS Console, search the IAM service and select it. Select the Users menu on the left, the following screenshot appears. Select the Add user button.
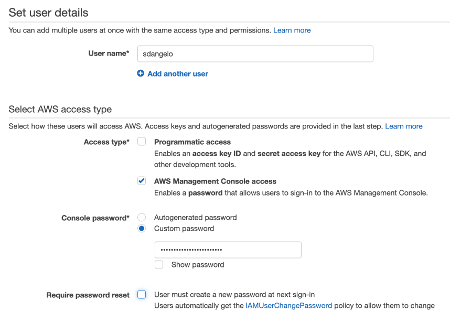
Enter the User name and the Console password, then click Next.
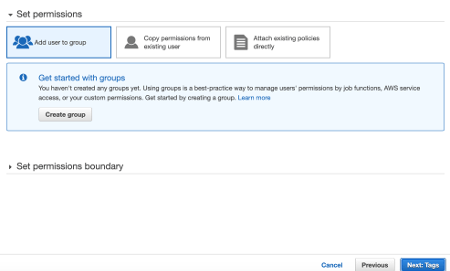
Select Add user to group and click the button Create group, then click the Next button.
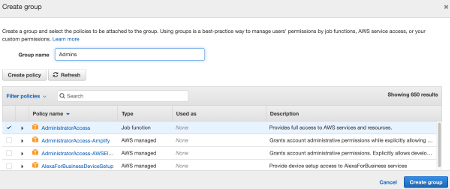
Enter Admins as Group name and select the predefined policy AdministratorAccess.
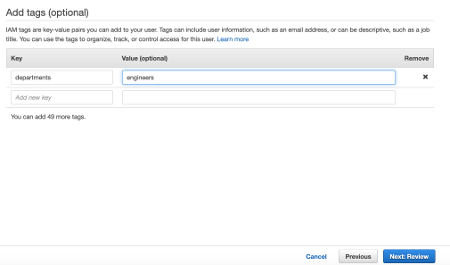
You can add one or more Tags to your user. For example, the Business Unit he belongs to, or his job role, and so on. In my example, I added a department tag with value engineers. Click Next to review the user information.
In this panel, you can review all the inserted data. In case of an error, you can go back and correct the mistake. Click the Create user button.

Selecting on the left menu the IAM Dashboard you can view the new user. From the IAM Dashboard, you can click the Edit link to change the Sign-in URL to access the AWS console.

At this point, you can log into the AWS console using the new administrator account.
Configure the Password Policy for your account.
You can change the Password Policy by clicking the Account Settings link on the left menu.
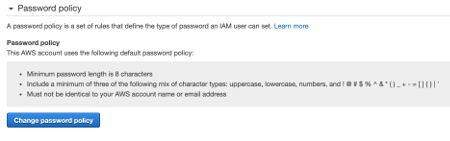
By default, AWS provides the following password policy:
- minimum password length is 8 characters;
-
include a minimum of three of the following mix of character types: uppercase, lowercase, numbers, and ! @ # $ % ^ & * ( ) _ + – = [ ] { } ‘; - must not be identical to your AWS account name or email address;
but you can change this default allowing password rotation, avoiding password reuse, and much more.
Create the Access Key and the Access Secret Key for the administrator
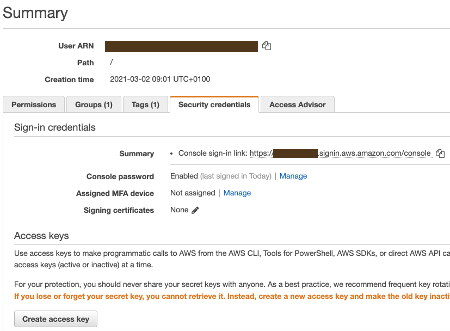
From the left menu select the Users link and click on the administrator user link.
Select the Security Credentials tab to create your Access Key. Click on the Create access key button.
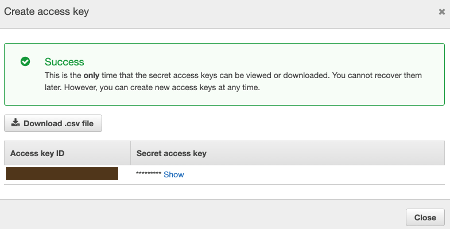
It’s important you keep track of the Access Key and Access Secret Key and Download the file on your computer because AWS doesn’t show them anymore.
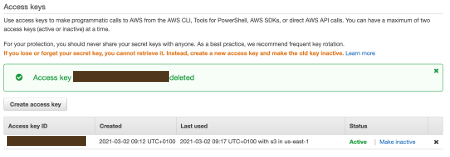
You created the Keys and you can use them to work with AWS CLI or access the resources programmatically via SDK.
IAM User and Role Access to Billing Information
One important setting for your account to keep expenses under control is to set up a Budget for your account. By default, the only account that can do this task is root. If you want to do the task using the administrator account you have to give it permissions. From the root account, click on the user drop-down menu and select My Account.
Scroll down until the IAM User and Role Access to Billing Information section and click the Edit link. Activate the IAM user/role access to billing information.
We will see how to set up a Budget for your account in the following article.
Conclusion
In conclusion, in this article, I explained my understanding of the IAM component, and how to use it for the initial setup of your account using the root user. From now on, you should no longer use the root account anymore and only the administrator user you should use to administer your account. In the next article, I’ll talk about the most important service of the Amazon platform: the Amazon EC2 service.

