The Definitive Amazon EC2 Tutorial: Step by step Guide for Beginners
Posted on 18 Mar 2021
In this Amazon EC2 Tutorial, I will show you how to create an EC2 instance and secure it with Security Groups. I will also show how to create Ec2 instances easily with EC2 launch templates.
Before to start you need to know that the Amazon dashboard can change over time and the screenshot in this article could not perfectly correspond to the one you see. Usually, when the dashboard change there is a period of time where a button appears on the top left that allows you to switch back to the old version.
Create your first amazon EC2 instance
Access to the EC2 Dashboard
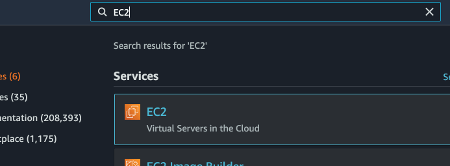
Login to your AWS account with the administrative account you set up in a previous tutorial. In the search bar write “EC2” and choose the Ec2 service.
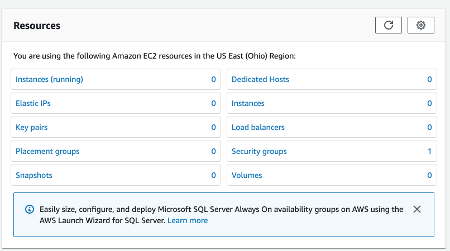
The EC2 Dashboard will appear. On the home page, there is a summary of AWS resources allocated in your account directly related to EC2 resources. Select the link Instances to access the Instances management dashboard.
Create the EC2 instance
Select the Launch Instances button to start the launching of your first Ec2 instance.

As a first step, select the operating system to install on your instance. Amazon AWS uses the concept of Amazon Machine Image (AMI) that are prebuilt images with a given operating system. The default image is the Amazon Image and here how Amazon defines it:
Amazon Linux 2 comes with five years support. It provides Linux kernel 4.14 tuned for optimal performance on Amazon EC2, systemd 219, GCC 7.3, Glibc 2.26, Binutils 2.29.1, and the latest software packages through extras. This AMI is the successor of the Amazon Linux AMI that is approaching end of life on December 31, 2020 and has been removed from this wizard.
The one I use in this tutorial is an image with Ubuntu 20 for 64-bit x86 architecture. Click on the Select button.

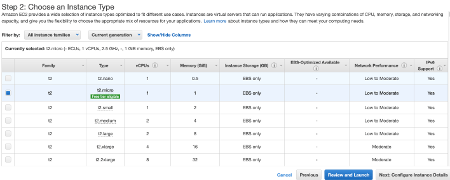
Select the t2.micro instance type because it is the only one eligible for Free Tier. This instance has 1 CPU, 1 Gb RAM, and up to 30 Gb of storage you can attach to it. This is enough for our tests. Click on the Next: Configure Instance Details button.
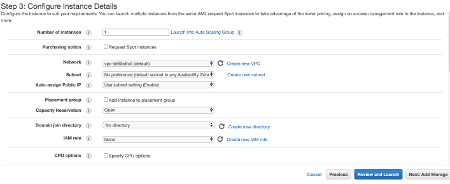
In the next panel, you can configure your EC2 instance. For example, if you select a subnet in your VPC you can force your EC2 instance in a specific AZ. However, for our test leave all the defaults and enter the following code in the User Data text field at the end of the page. Click the Next: Add Storage button.
#!/bin/bash
# Use this for your user data (script from top to bottom)
# install httpd (Linux 2 version)
sudo apt-get update
sudo apt-get install -y apache2
sudo systemctl start apache2
sudo systemctl enable apache2
echo "<h1>Hello World from $(hostname -f)</h1>" > /var/www/html/index.html
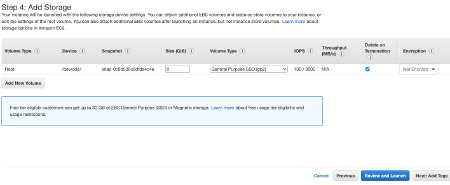
Now you can create volumes to attach to your EC2 instances. By default, EC2 has a volume of 8 Gb attached that will be mounted as a root file system. You can change the capacity of the disk up to 30 Gb in the Free Tier. Click the Next: Add Tags button.
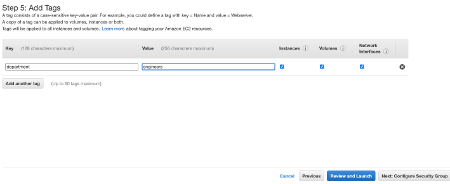
Tags are a useful way to classify your AWS resources. It is really important when you have a lot of resources to manage. For example, in this test, we associate a “department” tag with the value “engineers”. Click the Next: Configure Security Group button.
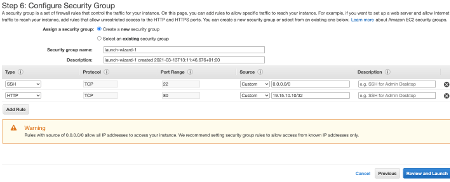
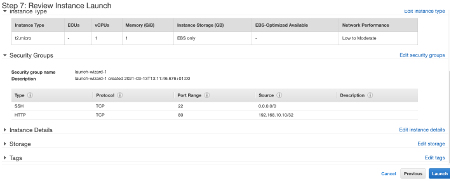
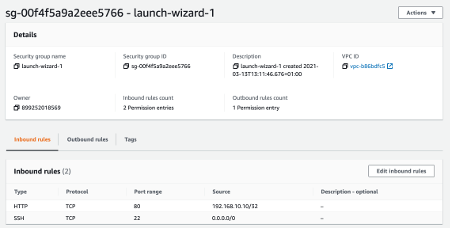
In this step, you can configure the EC2 Security Groups. By default, port 22 is open in order to allow you to access the machine remotely via SSH. In the next steps, you have to generate Keys to access the instance because they are more secure than passwords. Click the Next button. I opened also port 80 that is accessible only from my IP. In order to know which is my public IP, I use this website. This is required to access the website running on the EC2 instance. Click the Review and Launch button.
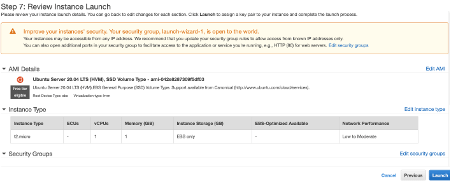
You can review now your EC2 instance and click the Launch button.
Now, in order to access remotely to your EC2 instance, you need to generate a Key Pair. Click the button Download Key Pair to save them on your computer. It’s important you do it immediately because it is your only chance to see your keys. You can click the Launch Instances button and wait until your EC2 instance is up and running.

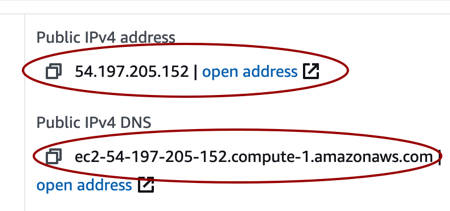
Now you can see the instance running. Select it and in the below box you can see the IP address and the domain name you will use later to access the Ec2 instance via SSH. This image has been taken for another EC2 instance. Assume the IP is 19.15.10.10 and the domain name is ec2-19-15-10-10.compute-1.amazonaws.com.
How to access the EC2 instance
How to access the EC2 instance via SSH
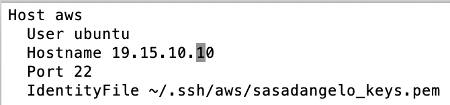
Save your key under whatever folder in ~/.ssh. For example, I save it in ~/.ssh/aws/sasadangelo_keys.pem. Make sure permissions are 400 with the following command:
chmod 400 ~/.ssh/aws/sasadangelo_keys.pem

Now you can access the Ec2 instance with the following command:
ssh -i ~/.ssh/aws/sasadangelo_keys.pem ubuntu@19.15.10.10
The “-i” option tells SSH to use the key to access the EC2 instance instead of a password. The user ubuntu is the default user for Ubuntu images. Finally, 19.15.10.10 is the IP address to access the instance. To avoid typing this long command every time, you can add the text in the following image in the ~/.ssh/config file.
Then you can access the Ec2 instance using the command:
ssh aws
How to access the “Hello World” application via browser
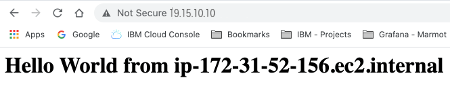
Type in the address bar of your browser the URL http://19.15.10.10 (in your case use the public IP of your EC2 instance). You should see the following output.
Secure your EC2 instance with Security Groups
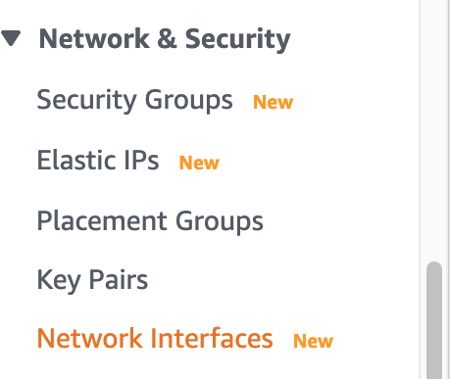
At whatever moment you can change the Security Group associated with your EC2 instance by selecting the link Security Groups in the Network & Security section of the left menu.
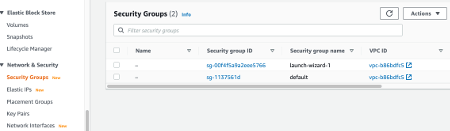
Select the Security Group you want to change.
Click on the tabs Inbound or Outbound rules depending on which rules you want to change. Click then the Edit Inbound (or Outbound) rules. You can add or remove rules depending on your needs as shown above.
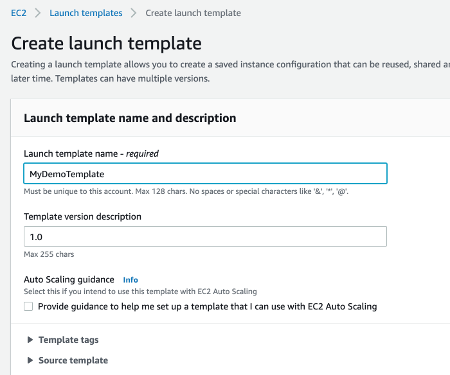
EC2 Launch Template
In the previous article, I talked about the EC2 launch template and why it is important. Let’s see how to create a launch template and use it to create Ec2 instances. From the console search bar, looks for EC2 and select the link launch templates. Click on the Create launch template button.

Insert the name of the template and the version.
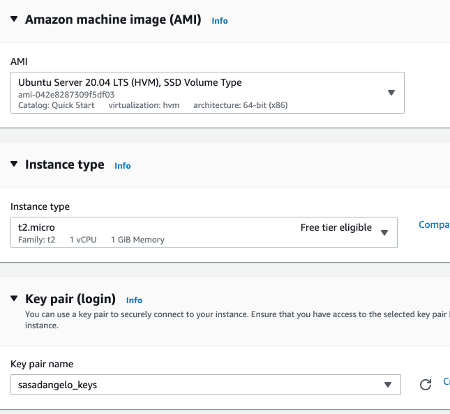
Select the Amazon Machine Image (AMI) to use, the instance type (t2.micro for Free Tier), and the key pairs. In this example, we use the Ubuntu Server 20.04 LTS as AMI.
Choose if you want to deploy the EC2 instance in a VPC or a classic network. Then select a previously created Security Group to use, the one created above with SSH and HTTP incoming traffic. If you want, you can modify the root file system volume by changing its type, size, encryption, and delete on terminate attribute. You can even add more volumes if you need. For this tutorial leave all the defaults.

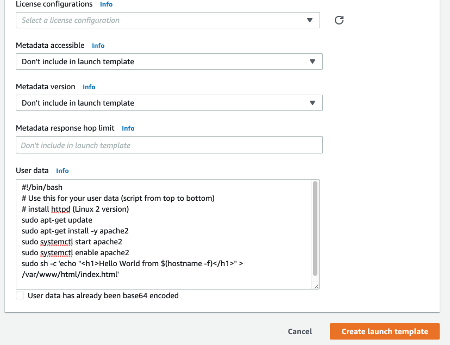
In the Advanced details section, insert the script below that will be run during the first boot of the machine. The script installs a web server and publishes a “Hello World” web page. Click the Create launch template button to save the template.
Click the View launch template button, select the template and then select Actions->Launch instance from template and then the Launch instance from template button.
Conclusion
In the previous article, we talked about EC2 instances, Security Groups, and Launch Templates. In this article, we saw how to use all these concepts in practice. This will be the starting point for future articles to start playing with the Amazon platform.
* Feature image from https://data-flair.training

